What Do You Put on Roof Before Shingles?
Posted on 25-08-2023 10:46 AM
What Do You Put on Roof Before Shingles?
Are you about to embark on a roofing project and wondering what you need to put on your roof before shingles? Look no further!
In this article, we'll guide you through the essential steps. You'll learn about the required roofing underlayment, how to install a vapor barrier, and where to place ice and water shield.
We'll also cover the importance of drip edge installation and the preparation needed for flashing and ventilation.
Get ready to tackle your roofing project with confidence!
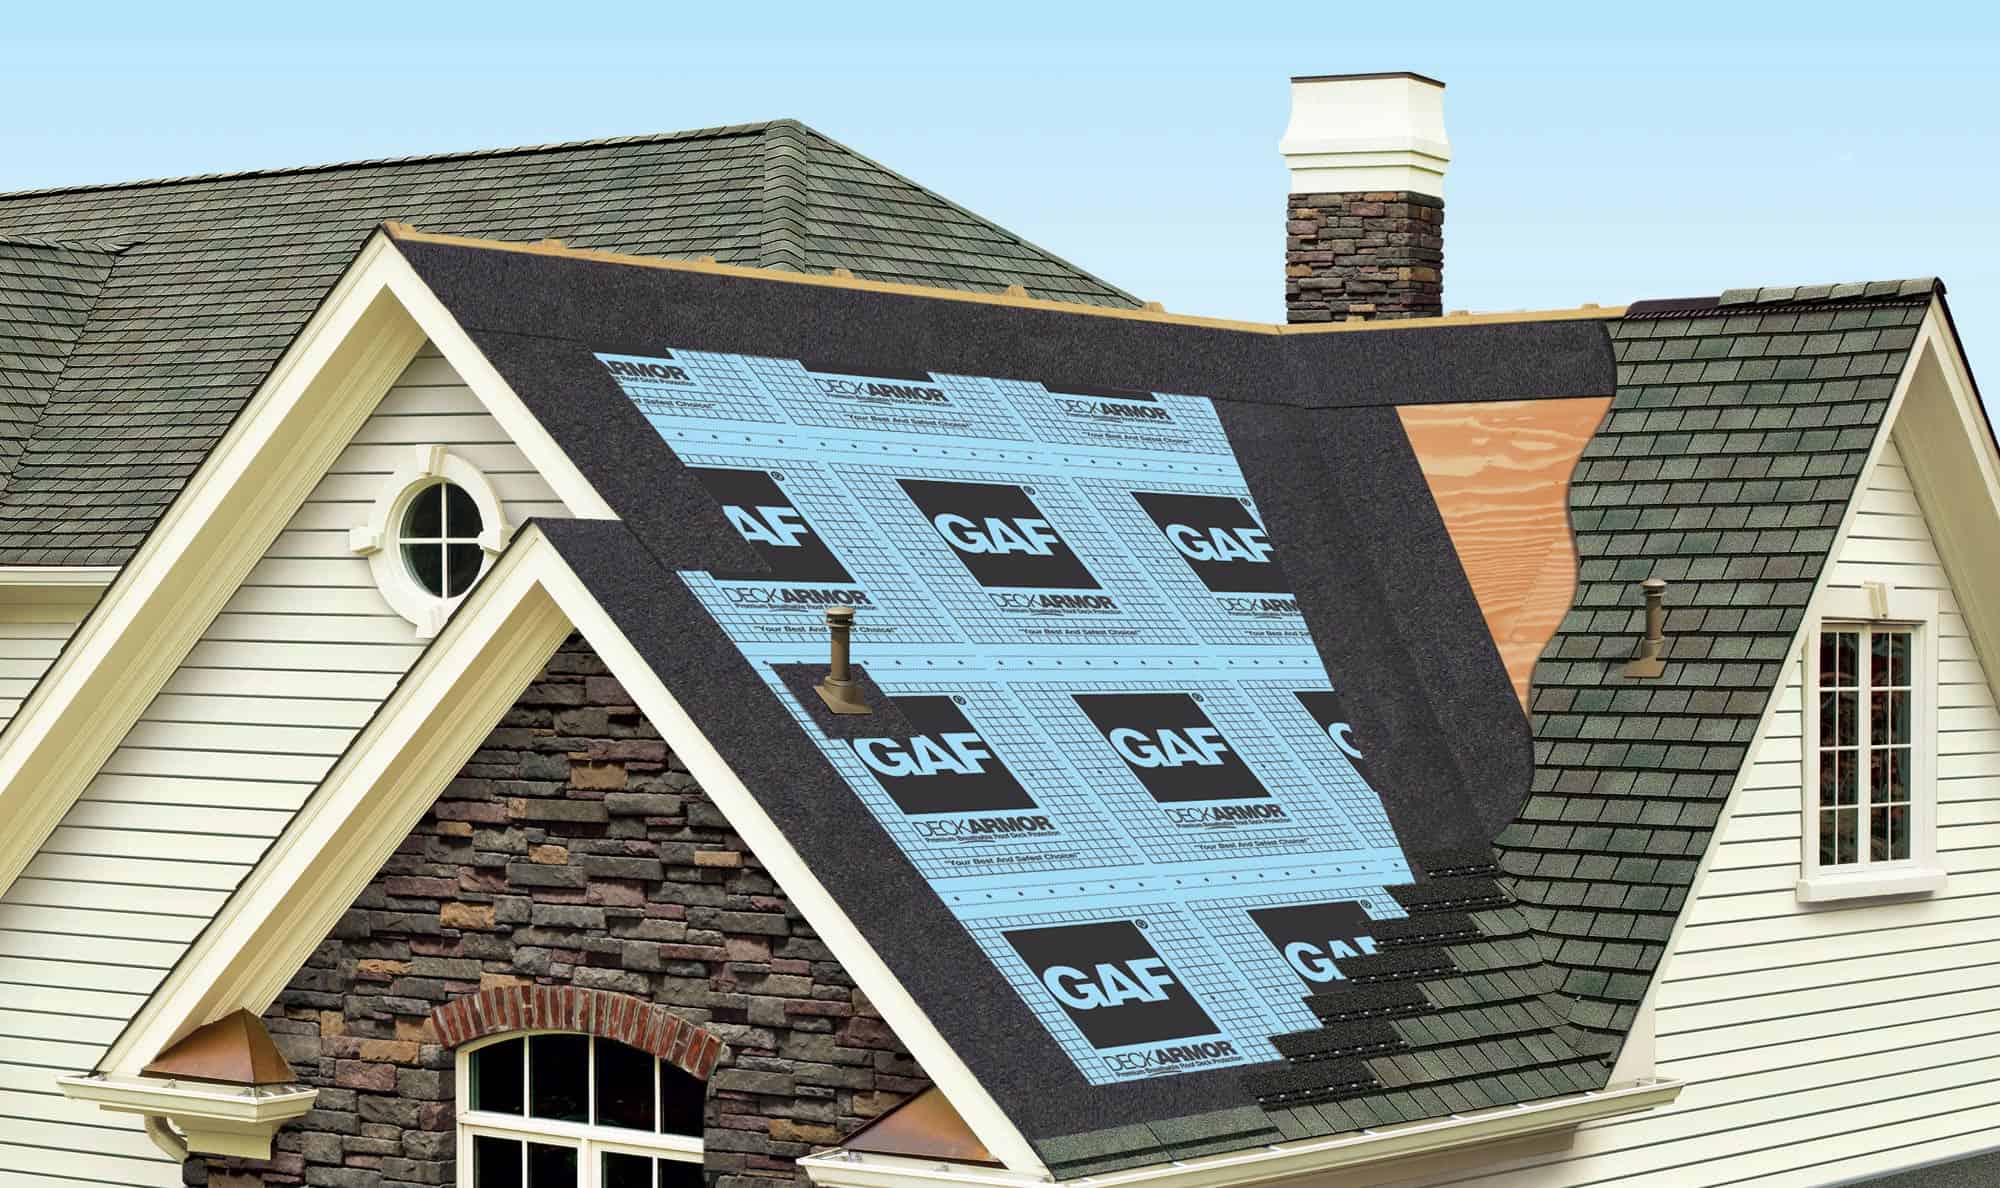
Required Roofing Underlayment
The underlayment is an essential component that must be installed on the roof before adding shingles. It acts as a protective layer, providing an extra barrier against water infiltration. Without it, your roof is vulnerable to leaks and other moisture-related issues.
The underlayment also helps to prevent the growth of mold and mildew, which can cause structural damage and health problems. It is typically made of asphalt-saturated felt or synthetic materials like rubber or polyethylene.
The underlayment is laid directly on top of the roof deck, creating a waterproof barrier that helps to keep your home dry and safe from the elements. Make sure to install the underlayment properly to ensure the longevity and effectiveness of your roofing system.
Vapor Barrier Installation
First, make sure to install a vapor barrier on your roof before adding shingles. A vapor barrier is a crucial component in protecting your roof from moisture damage. It acts as a barrier between the roof deck and the shingles, preventing any moisture from getting through.
Moisture can cause mold, mildew, and rot, which can significantly compromise the integrity of your roof. To install a vapor barrier, start by cleaning the roof deck and ensuring it is smooth and free from any debris. Then, roll out the vapor barrier material and secure it to the roof deck using nails or staples.
Make sure to overlap the seams and secure them properly. Once the vapor barrier is installed, you can proceed with adding the shingles, knowing that your roof is well-protected.
Ice and Water Shield Placement
Ensure that an ice and water shield is properly placed on the roof deck to prevent moisture penetration.
This essential step in roof installation helps protect your home from water damage caused by ice dams and heavy rain.
The ice and water shield acts as a barrier, effectively sealing vulnerable areas such as valleys, eaves, and roof penetrations.
It is typically applied before the shingles, directly onto the roof sheathing.
This self-adhesive membrane creates a watertight seal, preventing any water from seeping into the underlying layers of the roof.
By installing this shield correctly, you can safeguard your home against potential leaks and costly repairs.
Drip Edge Installation
To properly install a drip edge, make sure you position it along the edges of your roof for optimal water drainage. The drip edge is a metal strip that helps prevent water from seeping under the shingles and into your home.
Start by measuring the length of your roof's edges and cut the drip edge accordingly. Then, place the drip edge along the eaves, overlapping it into the gutter. Nail it in place, ensuring that it is flush against the roof's edge.
Be sure to install the drip edge before you install the underlayment and shingles. This will help redirect water away from the roof's edge, protecting it from potential damage caused by water infiltration.
Flashing and Ventilation Preparation
Check if there are any existing flashings or vents on your roof that need to be repaired or replaced. Flashings and vents play a crucial role in preventing water from seeping into your home.
Take a close look at the flashings around chimneys, skylights, and any other roof penetrations. Are they damaged or deteriorated? If so, it's important to address these issues before proceeding with any further roof installations.
Additionally, check the condition of your roof vents. Are they properly sealed and functioning effectively? Good ventilation is essential for maintaining a healthy and durable roof.
If you notice any issues with your flashings or vents, it's best to consult with a professional roofer who can assess the situation and provide the necessary repairs or replacements.
Don't neglect these important aspects of your roof, as they can greatly impact its longevity and performance.
Frequently Asked Questions
How Much Does It Cost to Install Roofing Underlayment?
Roofing underlayment is an essential layer that you need to install before shingles. It helps protect your roof from water damage and provides additional insulation.
The cost of installation varies depending on the size and type of your roof.
Can I Skip the Vapor Barrier Installation Step?
You shouldn't skip the vapor barrier installation step. It's crucial to prevent moisture from seeping into your roof and causing damage.
It's worth the time and investment to ensure the longevity of your shingles.
Is Ice and Water Shield Placement Necessary in Warmer Climates?
In warmer climates, it is still necessary to place ice and water shield before shingles. This protective layer helps prevent water damage and ensures the longevity of your roof.
Don't skip this step!
What Is the Purpose of Drip Edge Installation?
Before shingling your roof, it's important to install a layer of underlayment.
This helps protect against leaks and provides an extra barrier between the shingles and the roof deck.
How Does Flashing and Ventilation Preparation Impact the Lifespan of My Roof?
To maximize your roof's lifespan, proper flashing and ventilation preparation is crucial.
Flashing prevents water from seeping into vulnerable areas, while ventilation helps regulate temperature and moisture.
This prevents damage and prolongs your roof's longevity.
Conclusion
So, now you know what you need to put on your roof before shingles.
Remember, it's important to use the right roofing underlayment to protect your home from leaks and moisture.
Make sure to install a vapor barrier to prevent condensation and mold growth.
Don't forget to place an ice and water shield in areas prone to ice dams.
Install a drip edge to prevent water damage around the edges.
Lastly, prepare the flashing and ventilation to ensure proper airflow and protection.
With these steps, your roof will be ready for shingles and provide long-lasting protection for your home.